
In this guide, I’ll walk you through deploying a fully functional OpenStack cloud platform integrated with Ceph Tentacle as the distributed storage backend — all on a 3-node converged cluster running Ubuntu Noble 24.04.
This setup uses Kolla-Ansible for deploying OpenStack services as Docker containers, and cephadm for bootstrapping the Ceph cluster. By the end of this guide, you’ll have a working private cloud with:
- ☁️ OpenStack — Keystone, Glance, Nova, Neutron, Cinder, Horizon
- 💾 Ceph — Distributed storage for images, volumes, VMs, and backups
- 🌐 Networking — Provider + tenant networks with floating IPs
- 🖥️ VM Instances — Running CirrOS test instances with SSH access
Table of Contents
- Topology & Specifications
- Node Preparation
- Deploy Ceph Tentacle with cephadm
- Ceph Pool & Keyring Setup for OpenStack
- Install Kolla-Ansible
- Kolla-Ansible Configuration
- External Ceph Integration with Kolla-Ansible
- Deploy OpenStack
- OpenStack Network Setup
- Create VM Instance
- Verify VM Connectivity
1. Topology & Specifications
Network Topology
┌──────────────────┐ │ Proxmox Host │ │ vmbr0 (eno1) │ │ 192.168.205.253 │ └────────┬─────────┘ ┌─────────────────┼─────────────────┐ │ │ │ ens18 (Mgmt) ens18 (Mgmt) ens18 (Mgmt) 192.168.205.101 192.168.205.102 192.168.205.103 ens19 (Provider) ens19 (Provider) ens19 (Provider) (no IP) (no IP) (no IP) │ │ │ ┌─────────────────┐ ┌──────────────┐ ┌──────────────┐ │ ops-ceph-ctrl │ │ops-ceph-comp1│ │ops-ceph-comp2│ │ (controller) │ │ (compute) │ │ (compute) │ │ │ │ │ │ │ │ /dev/sda (OS) │ │ /dev/sda(OS) │ │ /dev/sda(OS) │ │ /dev/sdb OSD.0 │ │ /dev/sdb OSD │ │ /dev/sdb OSD │ │ /dev/sdc OSD.1 │ │ /dev/sdc OSD │ │ /dev/sdc OSD │ │ /dev/sdd OSD.2 │ │ /dev/sdd OSD │ │ /dev/sdd OSD │ └─────────────────┘ └──────────────┘ └──────────────┘Node Specifications
| Parameter | ops-ceph-ctrl | ops-ceph-comp1 | ops-ceph-comp2 |
|---|---|---|---|
| CPU | 8 vCPU | 6 vCPU | 6 vCPU |
| RAM | 16 GB | 12 GB | 12 GB |
| Disk OS | 50 GB /dev/sda | 50 GB /dev/sda | 50 GB /dev/sda |
| Disk OSD | 3x 25 GB (/dev/sdb,sdc,sdd) | 3x 25 GB | 3x 25 GB |
| NIC 1 | ens18 → 192.168.205.101/24 | ens18 → 192.168.205.102/24 | ens18 → 192.168.205.103/24 |
| NIC 2 | ens19 → no IP | ens19 → no IP | ens19 → no IP |
| OS | Ubuntu Noble 24.04 | Ubuntu Noble 24.04 | Ubuntu Noble 24.04 |
| Ceph Role | MON, MGR, OSD | OSD | OSD |
| OpenStack Role | Controller, Network | Compute | Compute |
2. Node Preparation
Run the following steps on all nodes unless stated otherwise.
2.1 Set Hostname
# On ops-ceph-ctrlhostnamectl set-hostname ops-ceph-ctrl
# On ops-ceph-comp1hostnamectl set-hostname ops-ceph-comp1
# On ops-ceph-comp2hostnamectl set-hostname ops-ceph-comp22.2 Configure /etc/hosts
sudo nano /etc/hostsAdd on all nodes:
192.168.205.101 ops-ceph-ctrl192.168.205.102 ops-ceph-comp1192.168.205.103 ops-ceph-comp22.3 Configure Netplan
sudo nano /etc/netplan/50-cloud-init.yamlExample for ops-ceph-ctrl:
network: version: 2 renderer: networkd ethernets: ens18: addresses: - 192.168.205.101/24 routes: - to: default via: 192.168.205.1 nameservers: addresses: [8.8.8.8, 1.1.1.1] ens19: dhcp4: falseAdjust IP for comp1 (
192.168.205.102) and comp2 (192.168.205.103).ens19only needsdhcp4: falsewithout an IP — Neutron will use it as the provider interface.
sudo netplan apply2.4 Install Dependencies
sudo apt updatesudo apt install -y git curl wget python3-dev python3-venv \ libffi-dev gcc libssl-dev libdbus-glib-1-dev chrony sshpass nano2.5 Configure Passwordless SSH (from ops-ceph-ctrl)
# Generate SSH key (ed25519)ssh-keygen -t ed25519 -C "ops-ceph-ctrl"
# Distribute public key to all nodes including selfssh-copy-id opsce@ops-ceph-ctrlssh-copy-id opsce@ops-ceph-comp1ssh-copy-id opsce@ops-ceph-comp22.6 Set NOPASSWD sudo (all nodes)
echo "opsce ALL=(ALL) NOPASSWD: ALL" | sudo tee /etc/sudoers.d/opsce2.7 Disable Swap & Time Sync
sudo swapoff -asudo sed -i '/swap/d' /etc/fstab
sudo timedatectl set-timezone Asia/Jakartasudo systemctl enable --now chronychronyc tracking2.8 Sysctl Configuration
sudo nano /etc/sysctl.confAdd:
net.ipv4.ip_forward = 1net.bridge.bridge-nf-call-iptables = 1net.bridge.bridge-nf-call-ip6tables = 1sudo sysctl -p2.9 Install Docker
curl -sL https://get.docker.com | bashsudo systemctl enable --now docker3. Deploy Ceph Tentacle with cephadm
All steps are executed from ops-ceph-ctrl unless stated otherwise.
3.1 Install cephadm
curl --silent --remote-name --location \ https://download.ceph.com/rpm-tentacle/el9/noarch/cephadm
chmod +x cephadmsudo install -m 0755 cephadm /usr/local/sbin/cephadm
sudo cephadm add-repo --release tentaclesudo apt updatesudo apt install -y cephadm3.2 Bootstrap Ceph Cluster
sudo cephadm bootstrap \ --mon-ip <your-controller-ip> \ --cluster-network <your-subnet>/24 \ --initial-dashboard-user <dashboard-user> \ --initial-dashboard-password <dashboard-password> \ --allow-overwriteVerify:
sudo cephadm shell -- ceph -s3.3 Install ceph-common
# On ctrlsudo cephadm install ceph-common
# On comp1 and comp2ssh -t ops-ceph-comp1 "sudo cephadm add-repo --release tentacle && sudo apt update && sudo apt install -y ceph-common"ssh -t ops-ceph-comp2 "sudo cephadm add-repo --release tentacle && sudo apt update && sudo apt install -y ceph-common"3.4 Copy cephadm SSH Key to All Nodes
sudo cephadm shell -- ceph cephadm get-pub-key | \ sudo tee /etc/ceph/ceph.pub
# Must run as rootsudo sussh-copy-id -f -i /etc/ceph/ceph.pub root@ops-ceph-comp1ssh-copy-id -f -i /etc/ceph/ceph.pub root@ops-ceph-comp2exit3.5 Add Nodes to Cluster
sudo cephadm shell -- ceph orch host add ops-ceph-comp1 192.168.205.102sudo cephadm shell -- ceph orch host add ops-ceph-comp2 192.168.205.103
# Verifysudo cephadm shell -- ceph orch host ls3.6 Deploy OSD
# ops-ceph-ctrlsudo cephadm shell -- ceph orch daemon add osd ops-ceph-ctrl:/dev/sdbsudo cephadm shell -- ceph orch daemon add osd ops-ceph-ctrl:/dev/sdcsudo cephadm shell -- ceph orch daemon add osd ops-ceph-ctrl:/dev/sdd
# ops-ceph-comp1sudo cephadm shell -- ceph orch daemon add osd ops-ceph-comp1:/dev/sdbsudo cephadm shell -- ceph orch daemon add osd ops-ceph-comp1:/dev/sdcsudo cephadm shell -- ceph orch daemon add osd ops-ceph-comp1:/dev/sdd
# ops-ceph-comp2sudo cephadm shell -- ceph orch daemon add osd ops-ceph-comp2:/dev/sdbsudo cephadm shell -- ceph orch daemon add osd ops-ceph-comp2:/dev/sdcsudo cephadm shell -- ceph orch daemon add osd ops-ceph-comp2:/dev/sddTip: Use
hostname:/dev/sdXformat — notuser@hostname:/dev/sdX. The latter causes a “host not found” error. Also, warnings likeNot using image... not in the list of non-dangling imagesare cosmetic and safe to ignore.
3.7 Verify Cluster
sudo cephadm shell -- ceph -ssudo cephadm shell -- ceph osd treesudo cephadm shell -- ceph dfMake sure all 9 OSDs (3 nodes × 3 disks) are up and in.
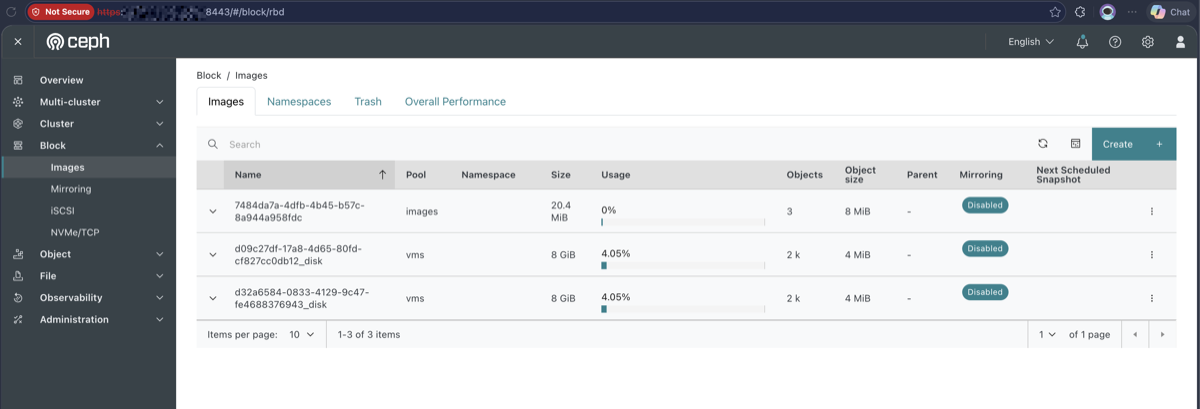
Here’s what the Ceph Block Images dashboard looks like after a successful deployment:
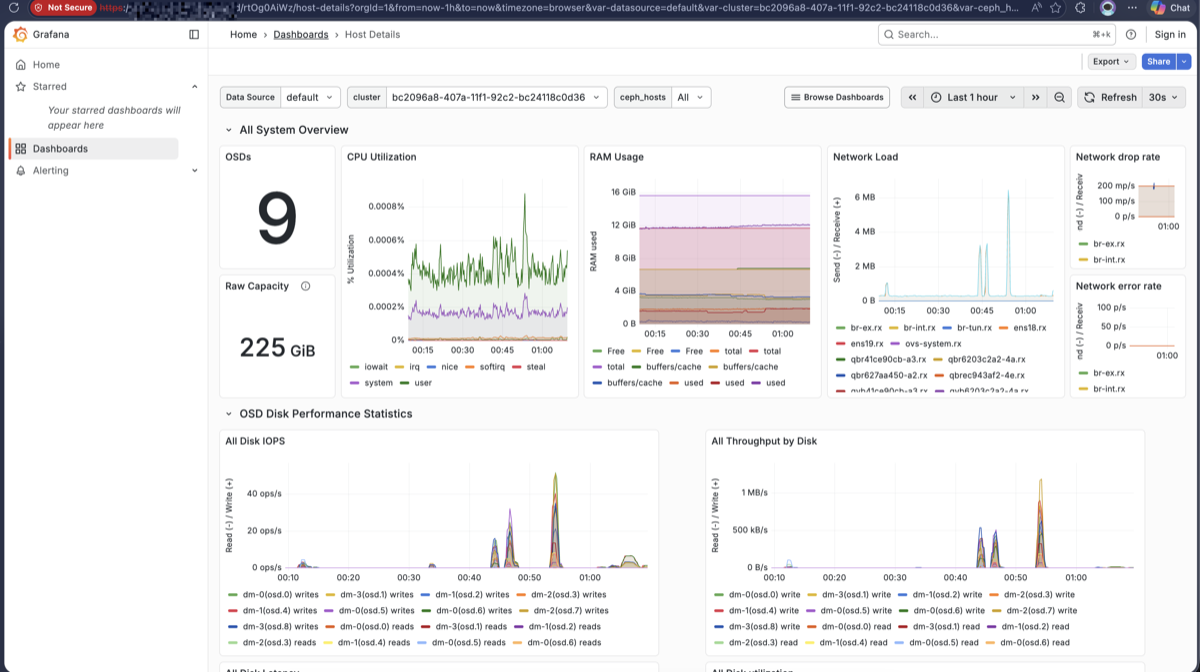
And the Grafana monitoring dashboard showing cluster health, OSD performance, and resource utilization:
4. Ceph Pool & Keyring Setup for OpenStack
4.1 Create Pools
sudo cephadm shell -- bash -c " ceph osd pool create volumes ceph osd pool create images ceph osd pool create backups ceph osd pool create vms
rbd pool init volumes rbd pool init images rbd pool init backups rbd pool init vms"4.2 Create Keyrings
sudo cephadm shell -- bash -c " ceph auth get-or-create client.glance \ mon 'allow r' \ osd 'allow class-read object_prefix rbd_children, allow rwx pool=images' \ -o /etc/ceph/ceph.client.glance.keyring
ceph auth get-or-create client.cinder \ mon 'allow r' \ osd 'allow class-read object_prefix rbd_children, allow rwx pool=volumes, allow rwx pool=images' \ -o /etc/ceph/ceph.client.cinder.keyring
ceph auth get-or-create client.nova \ mon 'allow r' \ osd 'allow class-read object_prefix rbd_children, allow rwx pool=vms, allow rx pool=images' \ -o /etc/ceph/ceph.client.nova.keyring
ceph auth get-or-create client.cinder-backup \ mon 'allow r' \ osd 'allow class-read object_prefix rbd_children, allow rwx pool=backups' \ -o /etc/ceph/ceph.client.cinder-backup.keyring"4.3 Export Keyrings to Host
sudo cephadm shell -- ceph auth get client.glance | sudo tee /etc/ceph/ceph.client.glance.keyringsudo cephadm shell -- ceph auth get client.cinder | sudo tee /etc/ceph/ceph.client.cinder.keyringsudo cephadm shell -- ceph auth get client.nova | sudo tee /etc/ceph/ceph.client.nova.keyringsudo cephadm shell -- ceph auth get client.cinder-backup | sudo tee /etc/ceph/ceph.client.cinder-backup.keyring
sudo chmod 640 /etc/ceph/ceph.client.*.keyring4.4 Generate ceph.conf
sudo cephadm shell -- ceph config generate-minimal-conf | sudo tee /etc/ceph/ceph.conf
# Remove leading tabs to prevent kolla-ansible issuessudo sed -i 's/^\t//' /etc/ceph/ceph.conf
cat /etc/ceph/ceph.conf5. Install Kolla-Ansible
Run from ops-ceph-ctrl as user
opsce.
5.1 Create Virtual Environment
python3 -m venv ~/kolla-venvsource ~/kolla-venv/bin/activate
# Auto-activate on loginecho 'source ~/kolla-venv/bin/activate' >> ~/.bashrc5.2 Install Kolla-Ansible
pip install -U pippip install 'ansible-core>=2.16,<2.17'pip install docker dbus-python
# Install kolla-ansible from masterpip install git+https://opendev.org/openstack/kolla-ansible@master5.3 Setup Kolla Directories
sudo mkdir -p /etc/kollasudo chown $USER:$USER /etc/kolla
cp -r ~/kolla-venv/share/kolla-ansible/etc_examples/kolla/* /etc/kolla/cp ~/kolla-venv/share/kolla-ansible/ansible/inventory/multinode ~/multinode5.4 Install Ansible Galaxy Dependencies
kolla-ansible install-deps6. Kolla-Ansible Configuration
6.1 Ansible Config
sudo mkdir -p /etc/ansiblesudo tee /etc/ansible/ansible.cfg <<EOF[defaults]host_key_checking = Falsepipelining = Trueforks = 100interpreter_python = /usr/bin/python3EOF6.2 Multinode Inventory
nano ~/multinodeUpdate the top section:
[control]ops-ceph-ctrl
[network]ops-ceph-ctrl
[compute]ops-ceph-comp1ops-ceph-comp2
[monitoring]ops-ceph-ctrl
[storage]ops-ceph-ctrlops-ceph-comp1ops-ceph-comp2
[deployment]localhost ansible_connection=localLeave all
[xxx:children]groups as default from the template.
Verify:
ansible -i ~/multinode all -m ping6.3 Generate Passwords
kolla-genpwd
# Set admin password (replace with your own secure password)sed -i 's/^keystone_admin_password:.*/keystone_admin_password: <your-password>/' /etc/kolla/passwords.yml6.4 Configure globals.yml
nano /etc/kolla/globals.yml# =====================# BASE IMAGE# =====================kolla_base_distro: "ubuntu"
# =====================# NETWORKING# =====================network_interface: "ens18"neutron_external_interface: "ens19"kolla_internal_vip_address: "192.168.205.100"
# =====================# ENABLE SERVICES# =====================enable_openstack_core: "yes"enable_cinder: "yes"enable_cinder_backup: "yes"
# =====================# CEPH INTEGRATION# =====================glance_backend_ceph: "yes"cinder_backend_ceph: "yes"nova_backend_ceph: "yes"
ceph_glance_user: "glance"ceph_glance_pool_name: "images"ceph_cinder_user: "cinder"ceph_cinder_pool_name: "volumes"ceph_cinder_backup_user: "cinder-backup"ceph_cinder_backup_pool_name: "backups"ceph_nova_user: "nova"ceph_nova_pool_name: "vms"
kolla_internal_vip_addressmust be an unused IP in theens18subnet. This IP will automatically appear on theens18interface of ops-ceph-ctrl after deployment as the HAProxy VIP.
7. External Ceph Integration with Kolla-Ansible
7.1 Create Directories
mkdir -p /etc/kolla/config/glancemkdir -p /etc/kolla/config/novamkdir -p /etc/kolla/config/cinder/cinder-volumemkdir -p /etc/kolla/config/cinder/cinder-backup7.2 Copy ceph.conf
cp /etc/ceph/ceph.conf /etc/kolla/config/glance/ceph.confcp /etc/ceph/ceph.conf /etc/kolla/config/nova/ceph.confcp /etc/ceph/ceph.conf /etc/kolla/config/cinder/ceph.conf7.3 Copy Keyrings
# Glancecp /etc/ceph/ceph.client.glance.keyring \ /etc/kolla/config/glance/ceph.client.glance.keyring
# Nova (needs both nova AND cinder keyrings)sudo cp /etc/ceph/ceph.client.nova.keyring \ /etc/kolla/config/nova/ceph.client.nova.keyringsudo cp /etc/ceph/ceph.client.cinder.keyring \ /etc/kolla/config/nova/ceph.client.cinder.keyring
# Cinder Volumesudo cp /etc/ceph/ceph.client.cinder.keyring \ /etc/kolla/config/cinder/cinder-volume/ceph.client.cinder.keyring
# Cinder Backupsudo cp /etc/ceph/ceph.client.cinder.keyring \ /etc/kolla/config/cinder/cinder-backup/ceph.client.cinder.keyringsudo cp /etc/ceph/ceph.client.cinder-backup.keyring \ /etc/kolla/config/cinder/cinder-backup/ceph.client.cinder-backup.keyring7.4 Fix Ownership & Permissions
sudo chown -R opsce:opsce /etc/kolla/configsudo chmod 640 /etc/kolla/config/cinder/cinder-backup/*.keyringsudo chmod 640 /etc/kolla/config/cinder/cinder-volume/*.keyringsudo chmod 640 /etc/kolla/config/nova/*.keyringsudo chmod 640 /etc/kolla/config/glance/*.keyring7.5 Verify File Structure
find /etc/kolla/config -type f -printf "%u %p\n" | sortExpected output (all owned by opsce):
opsce /etc/kolla/config/cinder/ceph.confopsce /etc/kolla/config/cinder/cinder-backup/ceph.client.cinder-backup.keyringopsce /etc/kolla/config/cinder/cinder-backup/ceph.client.cinder.keyringopsce /etc/kolla/config/cinder/cinder-volume/ceph.client.cinder.keyringopsce /etc/kolla/config/glance/ceph.confopsce /etc/kolla/config/glance/ceph.client.glance.keyringopsce /etc/kolla/config/nova/ceph.confopsce /etc/kolla/config/nova/ceph.client.cinder.keyringopsce /etc/kolla/config/nova/ceph.client.nova.keyring8. Deploy OpenStack
8.1 Bootstrap Servers
kolla-ansible bootstrap-servers -i ~/multinodeHeads up: It’s common for Ceph MON/MGR services to go
inactive deadafter this step, since kolla-ansible reconfigures Docker daemon settings. If this happens, a simplesudo rebooton affected nodes is the cleanest fix. After reboot, verify Ceph health withsudo ceph -sbefore proceeding.
8.2 Pre-checks
kolla-ansible prechecks -i ~/multinode8.3 Deploy
kolla-ansible deploy -i ~/multinodeExpect this to take 20-60 minutes depending on your hardware and network speed. Occasional single-task failures on compute nodes are typically timing-related and generally resolve themselves — verify with
openstack compute service listafter deployment.
8.4 Post-Deploy
kolla-ansible post-deploy -i ~/multinode8.5 Install OpenStack Client & Load Credentials
pip install python-openstackclient \ -c https://releases.openstack.org/constraints/upper/2025.2
source /etc/kolla/admin-openrc.sh8.6 Verify Services
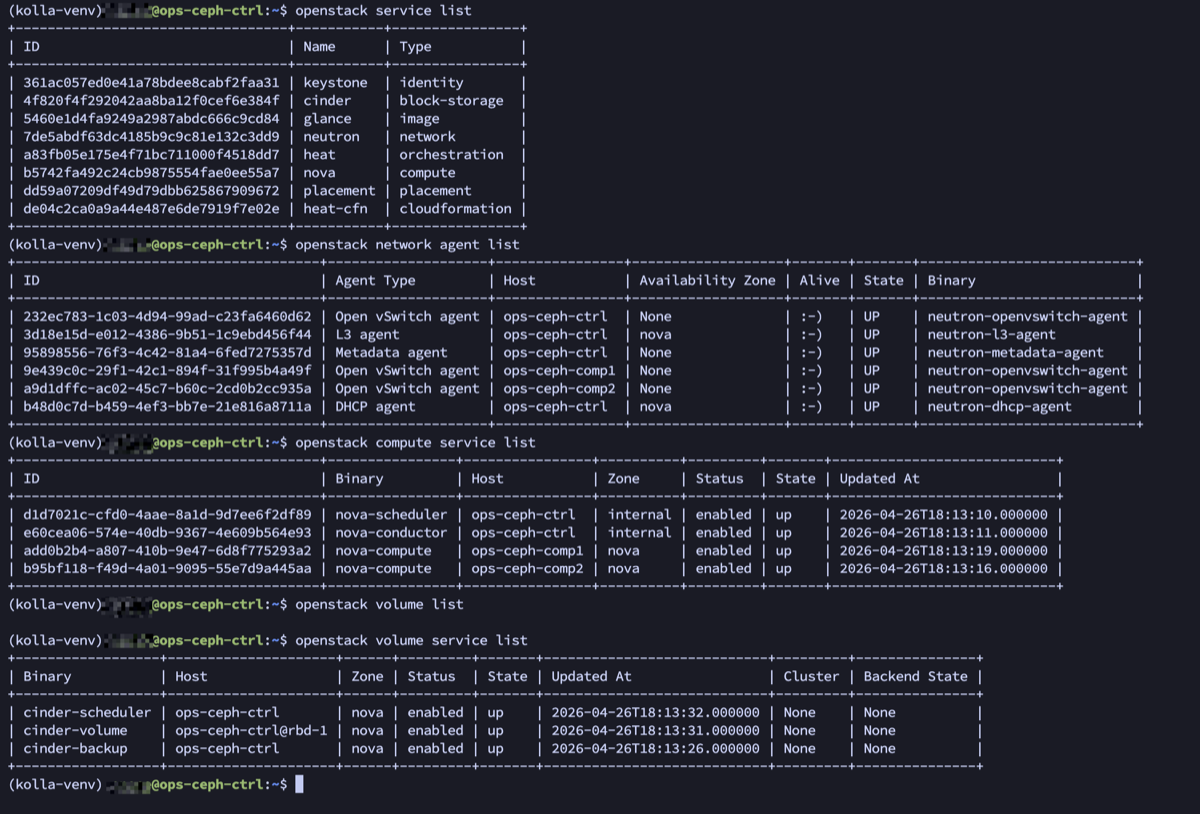
openstack service listopenstack compute service listopenstack network agent listopenstack volume service listAll services should be up. Note that cinder-volume backend shows rbd-1, confirming successful Ceph integration.
Here’s the actual output from a working deployment — all services, network agents, compute services, and volume services are confirmed up:
9. OpenStack Network Setup
9.1 Create Provider Network (External)
openstack network create \ --share \ --external \ --provider-physical-network physnet1 \ --provider-network-type flat \ public-net
openstack subnet create \ --network public-net \ --subnet-range 17.19.21.0/24 \ --gateway 17.19.21.254 \ --allocation-pool start=17.19.21.100,end=17.19.21.200 \ --dns-nameserver 8.8.8.8 \ public-subnet9.2 Create Private/Tenant Network
openstack network create private-net
openstack subnet create \ --network private-net \ --subnet-range 10.0.0.0/24 \ --gateway 10.0.0.1 \ --dns-nameserver 8.8.8.8 \ private-subnet9.3 Create Router
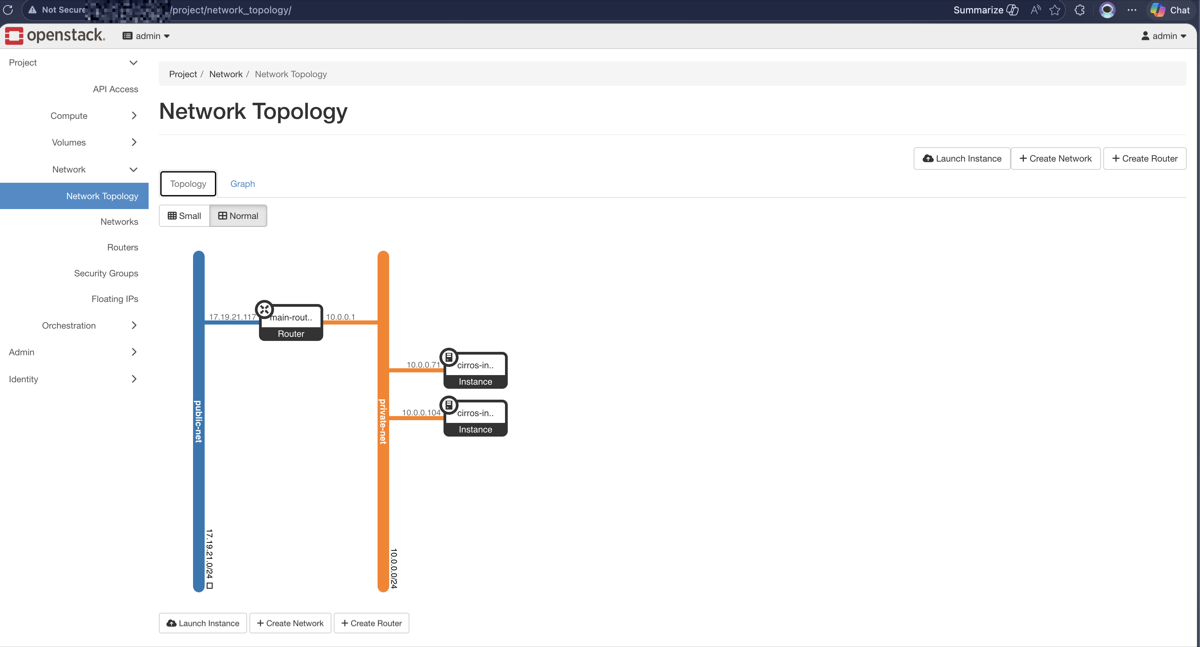
openstack router create main-routeropenstack router set main-router --external-gateway public-netopenstack router add subnet main-router private-subnet
# Verifyopenstack router show main-routeropenstack port list --router main-routerOnce the router is created, you can visualize the network topology in Horizon:
9.4 Create Security Group
openstack security group create security-group-net \ --description 'Allow SSH and ICMP'
openstack security group rule create \ --protocol icmp security-group-net
openstack security group rule create \ --protocol tcp --ingress --dst-port 22 security-group-net
openstack security group rule list security-group-net9.5 Create Floating IP
openstack floating ip create public-netopenstack floating ip listNote: Floating IPs are only externally reachable if the provider network interface is bridged to your physical network. In isolated lab environments, you can still access VMs via their private IPs using the Neutron router namespace (see Section 11).
10. Create VM Instance
10.1 Upload Image
wget http://download.cirros-cloud.net/0.6.2/cirros-0.6.2-x86_64-disk.img
openstack image create \ --disk-format qcow2 \ --container-format bare \ --public \ --file ./cirros-0.6.2-x86_64-disk.img \ cirros-0.6.2
openstack image list10.2 Create Keypair
openstack keypair create \ --public-key ~/.ssh/id_ed25519.pub \ controller-key
openstack keypair list10.3 Create Flavor
openstack flavor create \ --ram 512 \ --disk 8 \ --vcpus 1 \ --public \ c1-small
openstack flavor list10.4 Create Instance
# First instanceopenstack server create \ --flavor c1-small \ --image cirros-0.6.2 \ --key-name controller-key \ --security-group security-group-net \ --network private-net \ cirros-instance-test
# Second instance (for inter-VM connectivity test)openstack server create \ --flavor c1-small \ --image cirros-0.6.2 \ --key-name controller-key \ --security-group security-group-net \ --network private-net \ cirros-instance-test-2
# Check statusopenstack server listWait until status is ACTIVE.
10.5 Assign Floating IP
# List available floating IPsopenstack floating ip list
# Assign to each instanceopenstack server add floating ip cirros-instance-test <floating-ip-1>openstack server add floating ip cirros-instance-test-2 <floating-ip-2>
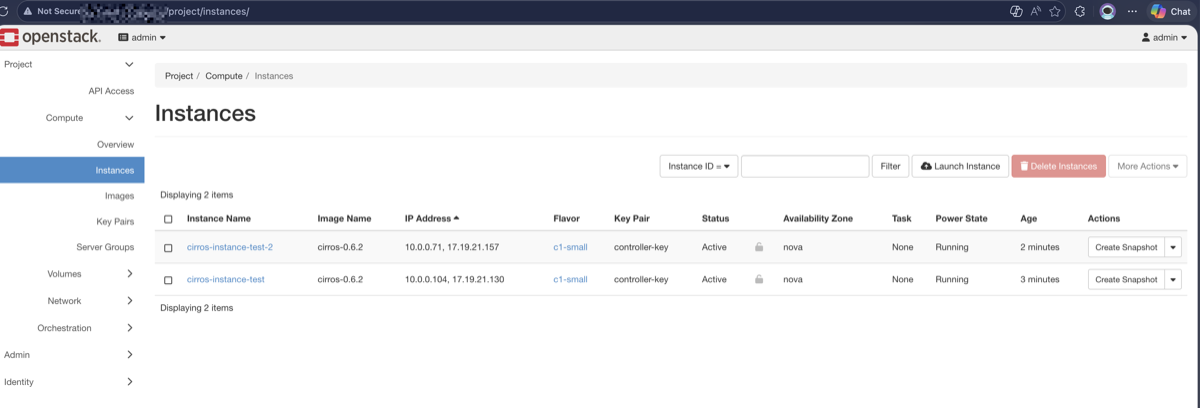
# Verify — instances should have 2 IPs (private + floating)openstack server listHere’s what it looks like in Horizon — both instances are Active and Running with their private and floating IPs assigned:
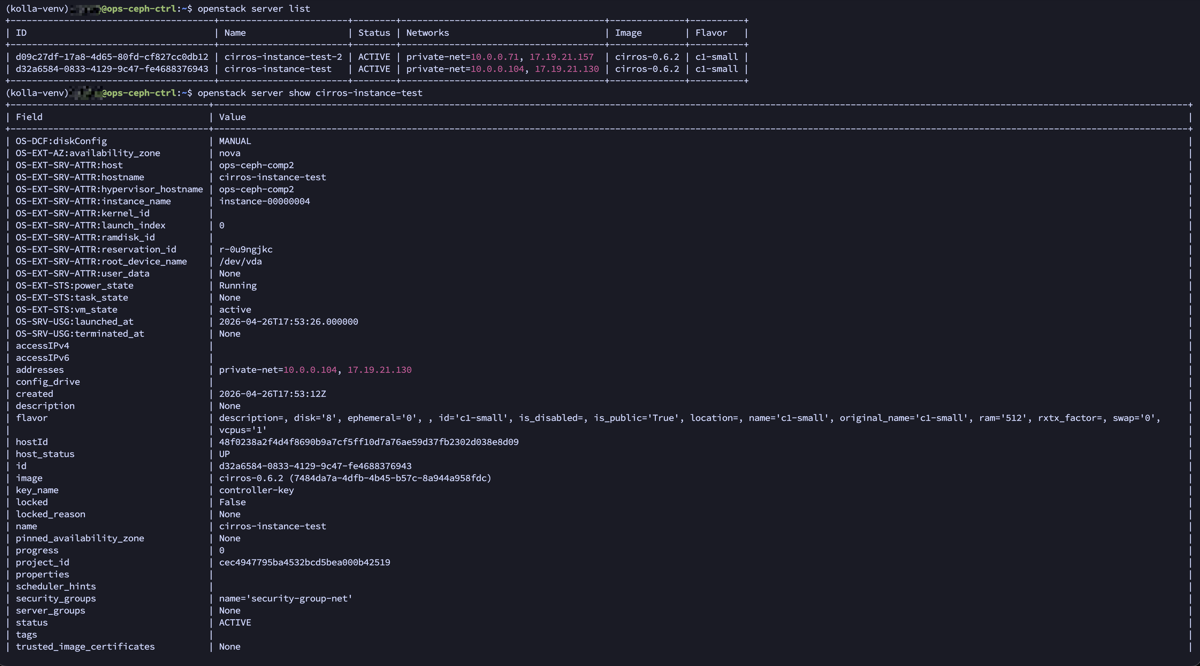
And the detailed server list from the CLI, confirming Ceph-backed storage and network connectivity:
11. Verify VM Connectivity
11.1 Check Router Namespace
# List all namespacessudo ip netns list# Output: qrouter-xxx (id: N), qdhcp-xxx (id: N)11.2 Ping VM from Namespace
# Replace <router-id> with the ID from ip netns list outputsudo ip netns exec qrouter-<router-id> ping -c 4 10.0.0.71sudo ip netns exec qrouter-<router-id> ping -c 4 10.0.0.10411.3 SSH to VM from Namespace
# SSH using key (recommended)sudo ip netns exec qrouter-<router-id> ssh -i ~/.ssh/id_ed25519 cirros@10.0.0.71
# Or SSH with password (cirros password: gocubsgo)sudo ip netns exec qrouter-<router-id> ssh cirros@10.0.0.7111.4 Test Inter-VM Connectivity
From inside cirros-instance-test, ping the other VM:
# Enter the first VMsudo ip netns exec qrouter-<router-id> ssh cirros@10.0.0.71
# From inside the VM, ping the second VMping 10.0.0.104Note: You cannot ping VMs directly from the controller host — there’s no route to the tenant or provider networks from the host’s default namespace. Always use
sudo ip netns exec qrouter-<id>to access VM networks from the controller.
11.5 Verify OVS Bridge
sudo docker exec openvswitch_vswitchd ovs-vsctl showVerify:
br-exhas portens19br-inthasqr-xxx(router port) andtap-xxx(VM port)- All bridge controllers show
is_connected: true
Troubleshooting
MON/MGR dies after bootstrap-servers
kolla-ansible reconfigures Docker settings which can prevent Ceph containers from restarting. A sudo reboot is the cleanest fix. Alternatively, manually start the services:
sudo systemctl start ceph-<fsid>@mon.<hostname>.servicesudo systemctl start ceph-<fsid>@mgr.<hostname>.<id>.serviceError “host not found” when adding OSD
Use hostname:/dev/sdX format — not user@hostname:/dev/sdX:
# CORRECTsudo cephadm shell -- ceph orch daemon add osd <hostname>:/dev/sdb# WRONGsudo cephadm shell -- ceph orch daemon add osd user@<hostname>:/dev/sdbWarning “Not using image… non-dangling images”
Cosmetic warning, not an error. Safe to ignore.
kolla-ansible: command not found
Ensure the Python virtual environment is activated:
source ~/kolla-venv/bin/activatewhich kolla-ansibleMissing sudo password during bootstrap-servers
Ensure passwordless sudo is configured for your deploy user:
echo "<user> ALL=(ALL) NOPASSWD: ALL" | sudo tee /etc/sudoers.d/<user>ceph.conf with leading tabs
Kolla-ansible may fail to parse ceph.conf if it contains tabs. Strip them:
sudo sed -i 's/^\t//' /etc/kolla/config/*/ceph.confCannot ping VM directly from controller
This is expected — the host has no route to tenant/provider networks. Use the Neutron router namespace:
sudo ip netns listsudo ip netns exec qrouter-<id> ping -c 4 <vm-ip>References
- Ceph Tentacle Documentation
- cephadm Install Guide
- Kolla-Ansible External Ceph
- Kolla-Ansible Quickstart
This guide is based on a real-world deployment. Adjust IPs, hostnames, credentials, and disk paths to match your own environment.